Art Specs & FAQ
General:
Disclaimers:
File Requirements:
All files and images must have a minimum of 300 dpi resolution to print sharp, high quality images. Images on the web are often created at a low resolution of 72 dpi which is ideal on websites to make them load faster and on your screen but it is NOT ideal for print. The quality of your files will determine the clarity of your print. Be careful when using programs like ProCreate and Canva, as these aren’t ideal for creating large, high resolution images for printing.
You file should be in either a Vector Format or created AT PRINT SIZE at 300dpi – meaning if you want your image printed at 3 feet by 2 feet, you would have to start your design in your program at 36″x24″ at 300 Dpi.
DPI = Dots Per Inch. A higher DPI means a higher image resolution and better image quality, but also larger file sizes.
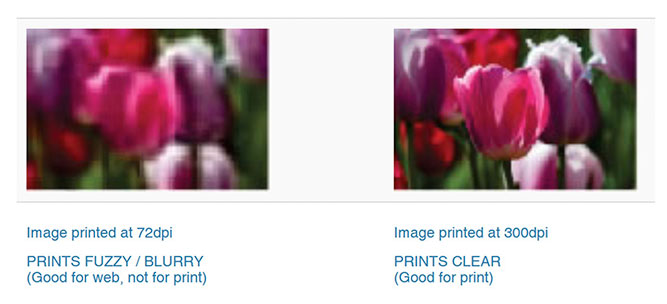
Though we can make a high-resolution picture into a low-resolution picture, we CANNOT make a low-resolution picture into high-resolution picture. If your file is lower than 300 dpi, you can make your picture smaller, which will increase the resolution (dots per inch). If you stretch a low resolution file to a bigger size, it will become even lower resolution, less dpi, and print as a blurry or pixelated image.
This concept is similar to tailoring clothes. You can cut and hem pants to make then shorter, but you cannot tailor your pants to make them longer than they already are, because they simply do not have enough fabric. If you are unable to find, obtain or recreate your art into a Print Ready format, there are plenty of design contracting services online, such as Fiverr.com and Upwork.com.
If you want any image, colors, and/or design to reach the edge of the printed product (no white outline), the file you provide must be specifically designed to have a bleed. A bleed is basically extra background colors or image stretched or “bleeding” outside of the cut line, so that the colors could be printed to the edge of the paper without showing white margins. If your final print piece has a white border, it does not need a bleed.
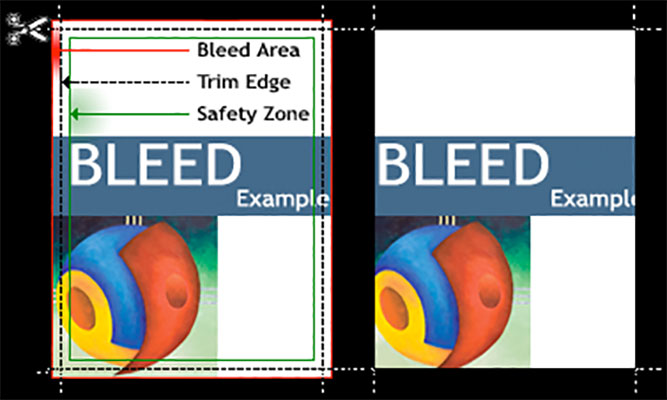
To create a bleed, you must stretch or extend your design beyond the the final cut size (size of the finished printed product), including any background colors, photos, or other items that you want on the edge of your paper.
Your design (colors or graphics touching the edge) must be extended by 0.125″ on all 4 sides, and after it is printed, it will be cut down to the final size, the size you ordered. Because the bleed is 0.125″ on all 4 sides, your page size will be 0.25″ larger than the final cut size on both the width and the height.
Example: If you order a 4″x6″ postcard, the PDF file you submit for print should be 4.25″x6.25.” It will be printed 4.25″x6.25″ and then the bleed, or excess image, will be cut off so that the final size delivered to you is 4″x6″ with the colors going to the edge of the paper.
*When using any of our Templates, you’ll notice they all have 3 lines:
– The INNER Line is the Safety Zone Line.
– The MIDDLE Line is the Cut Line – the edge that your art will be trimmed to.
– The OUTER Line is the BLEED Line – Your background art should extend out this far, but this area will be trimmed off during the Cutting phase of Production.
In addition to the bleed area beyond the edge of a page, it is good to allow a “safety zone” inside the image boundary. Any important elements, such as text or graphics not bleeding off the page, should be kept within this “safety zone,” which is a buffer zone of 0.125″ in from the edge on all four sides. This will make your printed piece look nicer and also help prevent any text or images too close to the cut line from being cut off because paper/vinyl may shift when cutting many sheets at once by the cutting machines.
*When using any of our Templates, you’ll notice they all have 3 lines:
– The INNER Line is the Safety Zone Line.
– The MIDDLE Line is the Cut Line – the edge that your art will be trimmed to.
– The OUTER Line is the BLEED Line – Your background art should extend out this far, but this area will be trimmed off during the Cutting phase of Production.
We recommend against thin borders near the edges of artwork due to shifts in the cutting process. This can cause borders to look uneven. During the cutting process, material can shift slightly in any direction, meaning we CAN NOT guarantee that an image with borders close to the edge will cut evenly. However, if you insist on having borders, they should be at least 1/4″ inside the outer edge where the image will be cut.
When working in Vector based Programs like Adobe Illustrator, be sure to outline your fonts to avoid font changes from computer to computer. Not every computer has the same fonts, and this is the best way to avoid fonts from shifting or changing.
NOTE: We will NEVER match exactly what you see on your screen as you’re designing. Colors always shift and no ones monitors are calibrated the same. Always keep that in mind!
Templates:
When using any of our Templates, you’ll notice they all have 3 lines:
– The INNER Line is the Safety Zone Line.
– The MIDDLE Line is the Cut Line – the edge that your art will be trimmed to.
– The OUTER Line is the BLEED Line – Your background art should extend out this far, but this area will be trimmed off during the Cutting phase of Production.
Click on the Bleed and Safety Zone links below for more information.